The #1 Guide to Getting started with Midjourney & AI Art
THE #1 GUIDE TO GETTING STARTED WITH MIDJOURNEY & AI ART
BECOME AN Ai ART GENERATION MASTER
 John “The Wingless” Burnett
Game UI Art Director, International Game UX Mentor, AI Art & Design Thoughtleader
THE #1 GUIDE TO GETTING STARTED WITH MIDJOURNEY & AI ART
LEARN ABOUT MACHINE LEARNING AND ART
FIRST EDITION
Pardon our dust! This is a living breathing Blog and Midjourney rapidly evolves – this Blog is being updated constantly!
–
Are you interested in creating amazing AI generative art, but don’t know where to start? Hello, you beautiful AI-curious human, look no further! In this beginner’s guide, I (Senior Artist, Art Director and Career Mentor in video games for nearly 20 years) will show you how to get set up with the best AI generative tool, Midjourney, for all your AI art projects.
Now I want to be pretty upfront with you: Midjourney doesn’t have the gentlest learning curve, and managing Discord certainly doesn’t help matters. But with my help, you’ll be Prompting and creating in no time! So, come with me and let’s learn how to create beautiful AI generative art using Midjourney, what I consider the absolute cream of the AI Art crop!
And yes, if you’re here exclusively to figure out how to make your own private room on Discord to use Midjourney, I’ve got you covered here!


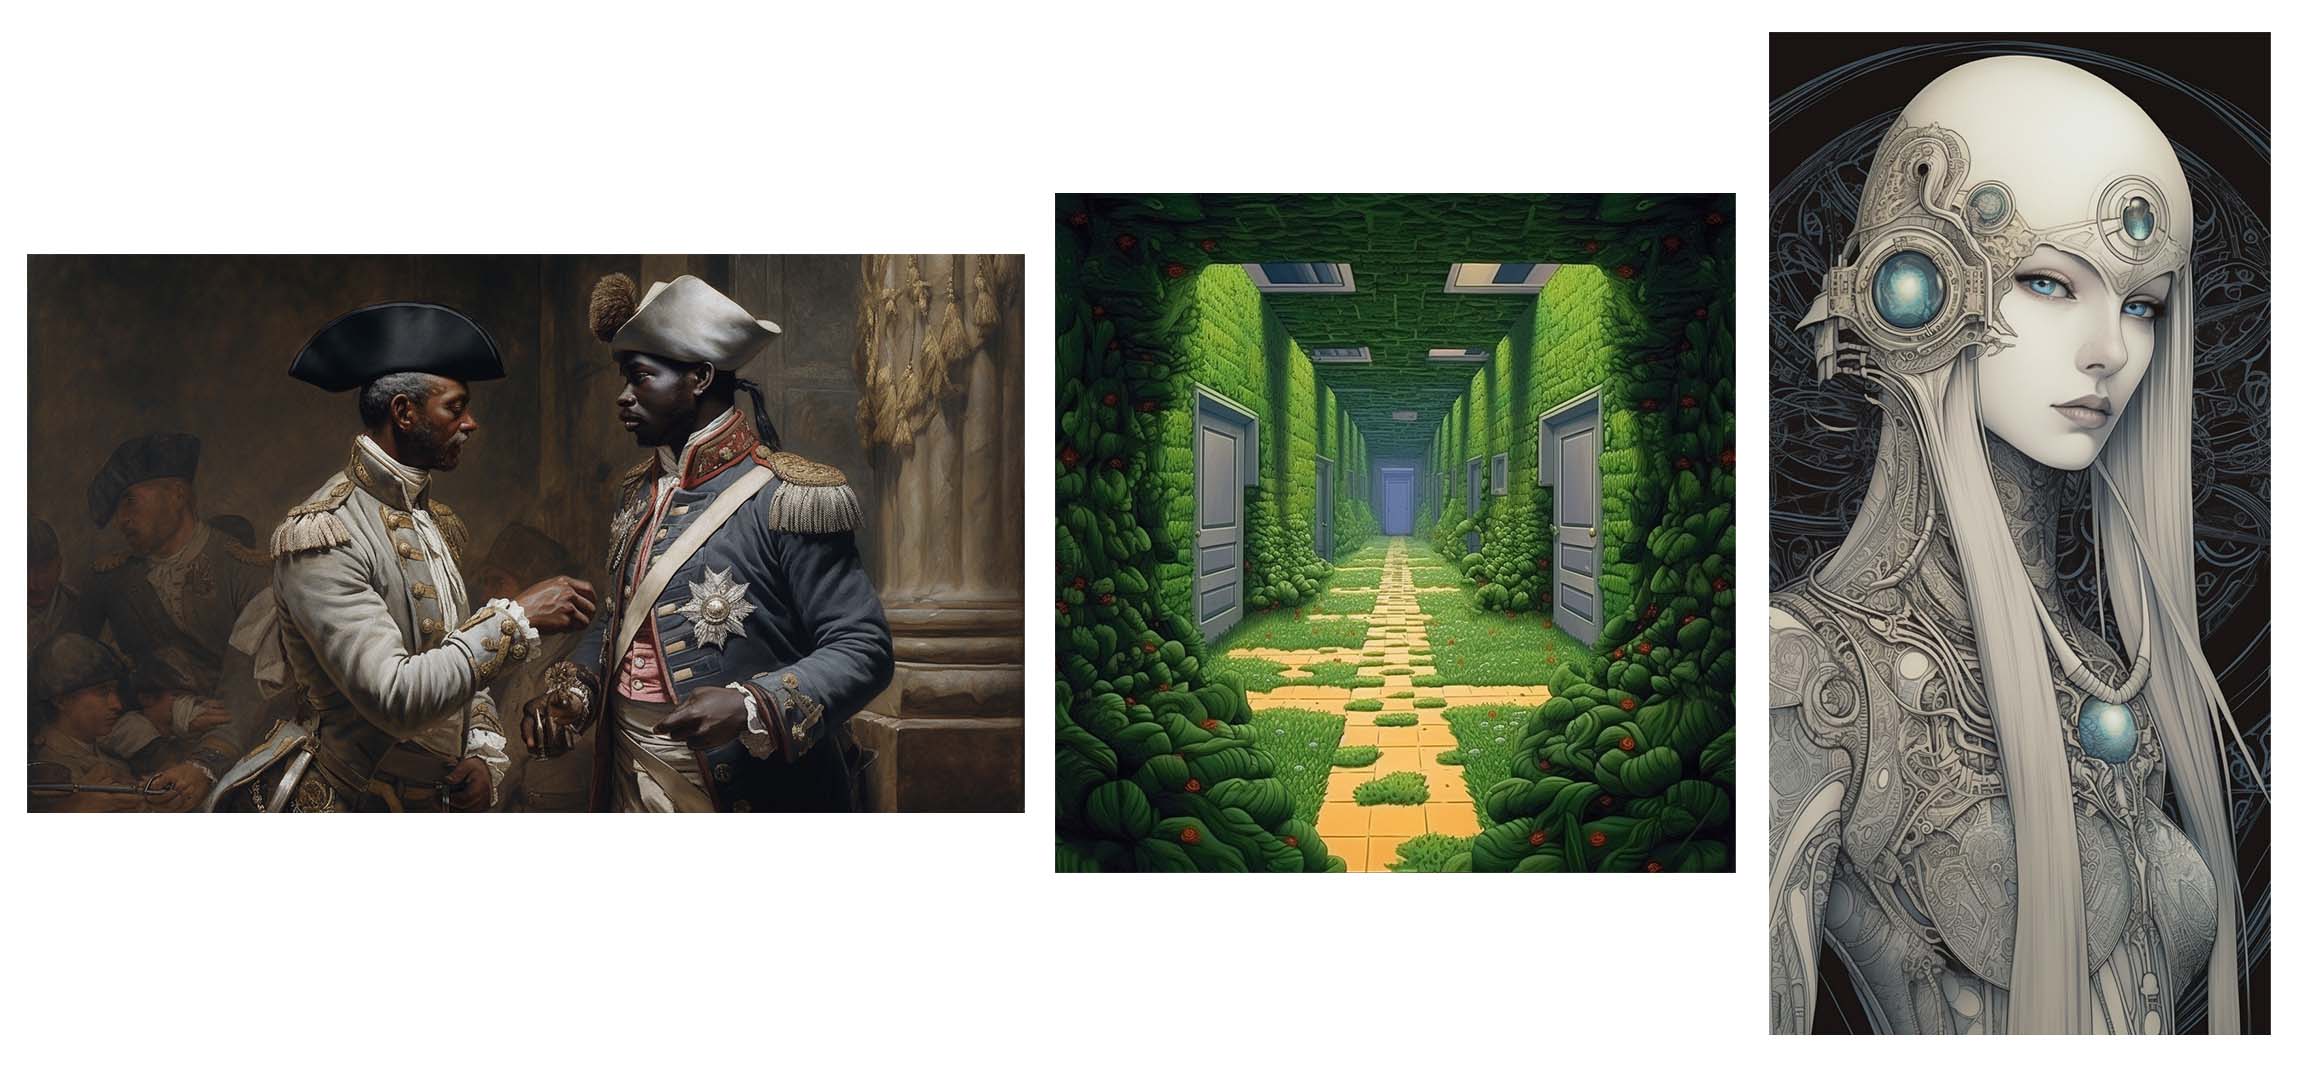
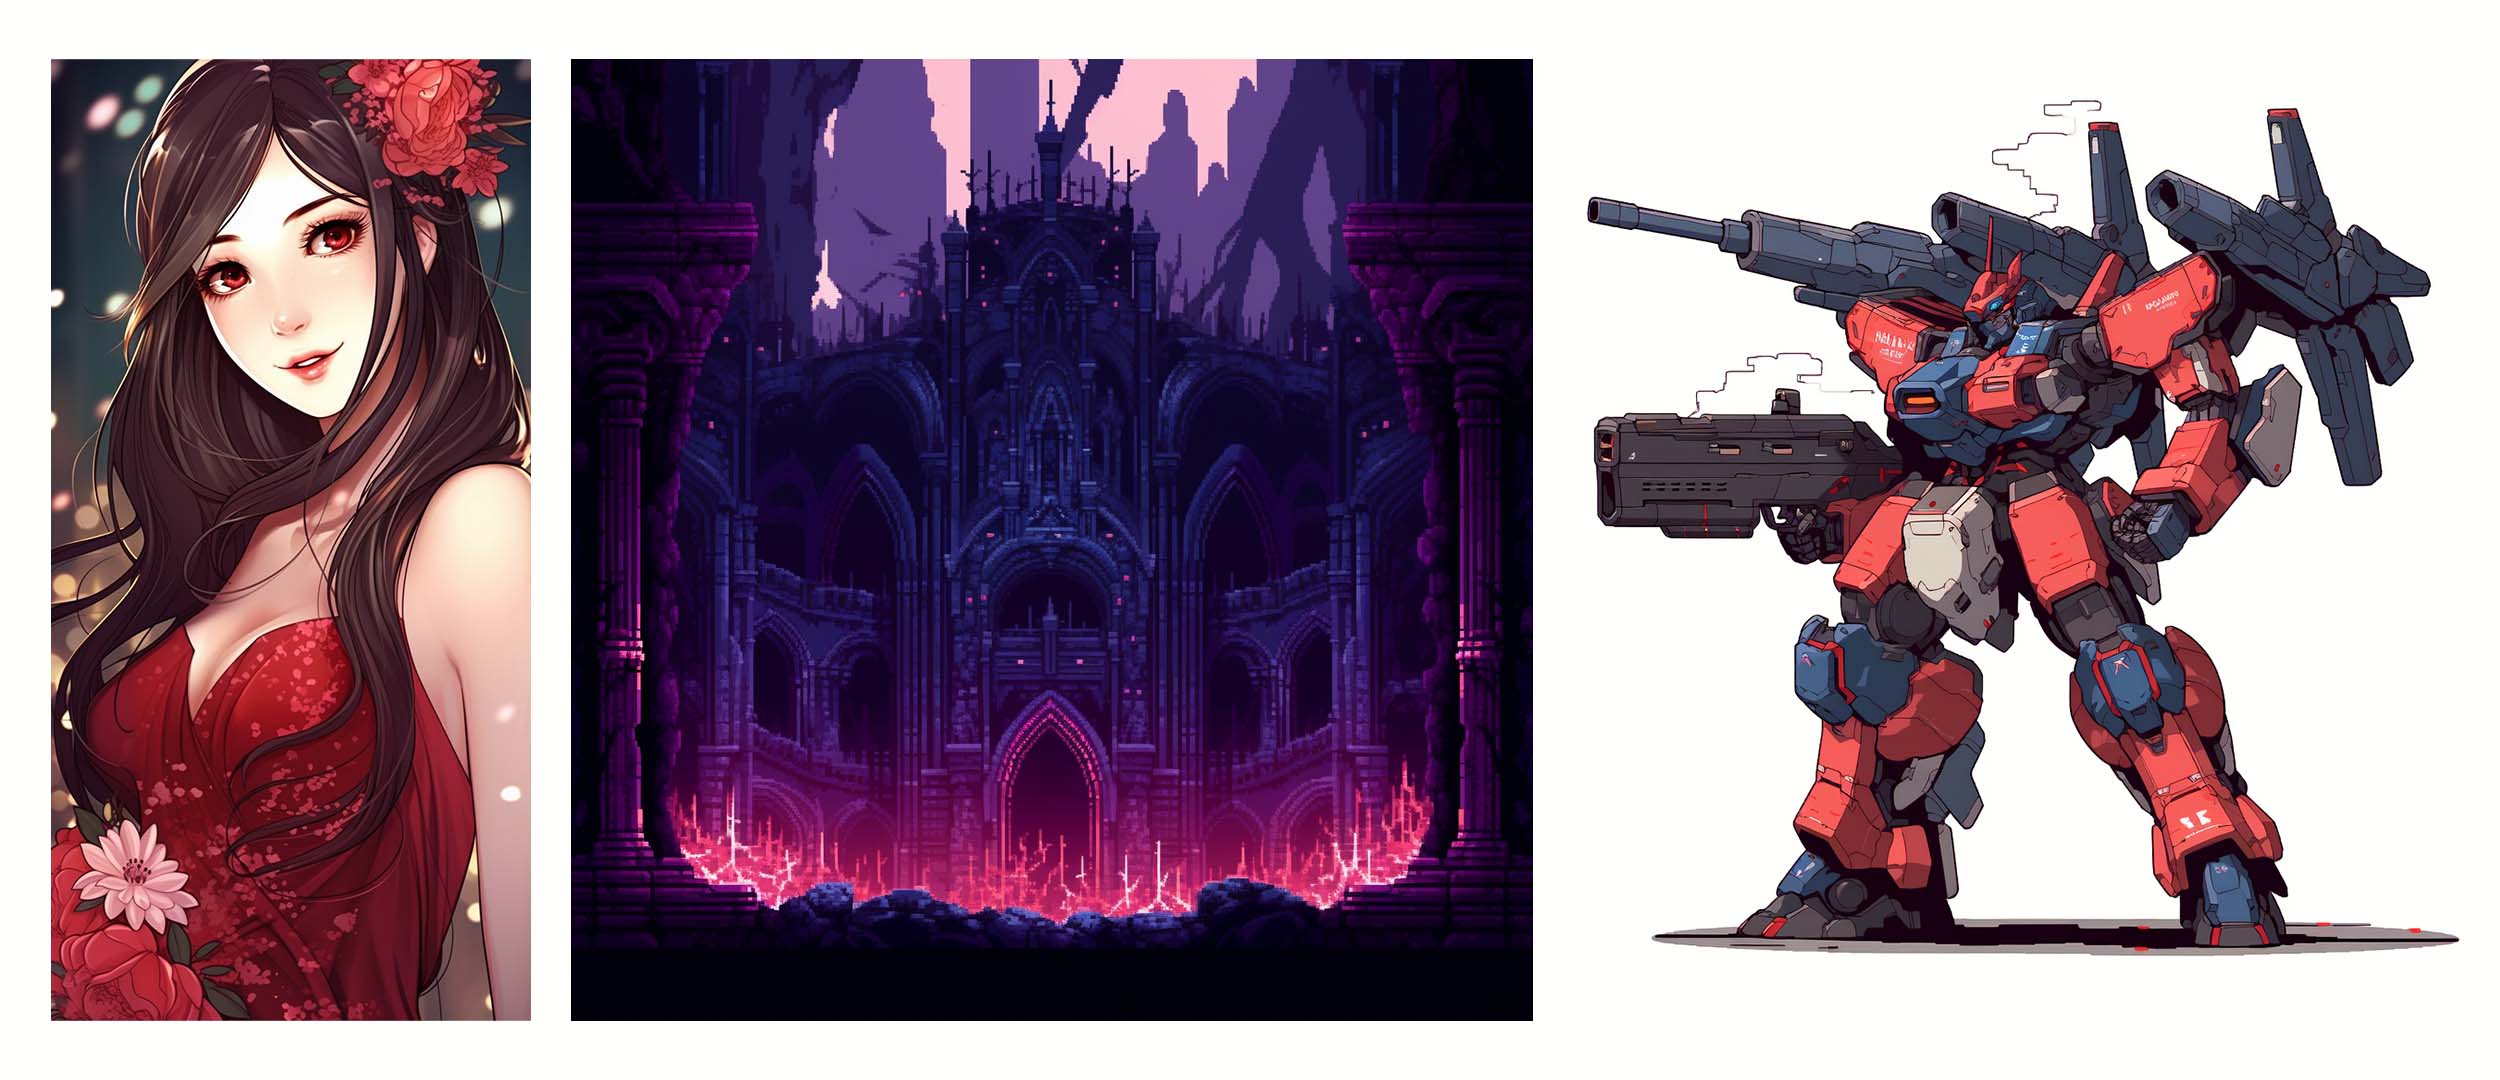
A very small Gallery of the variety of art you can make with Midjourney in mere moments!
TABLE OF CONTENTS
Part 1 – Getting Midjourney & Discord Set Up
Part 3 – Setting up your own Room (Probably why you’re here!)
Redirecting Messages to your Room
GETTING SETUP WITH MIDJOURNEY
AN ABSOLUTE BEGINNER'S GUIDE TO AI GENERATIVE ART
GETTING SET UP WITH MIDJOURNEY
Midjourney is my favorite AI Art generative program, and I consider myself as much of an expert as anyone can, with a tech that changes almost every other month. But don’t let its novelty and speedy evolution intimidate: this is one of the most electryfiying and inspiring technologies of a generation. And, best of all, with some simple guidance from me (and simple Prompting by you), you can start creating beautiful AI art pieces in no time.
Midjourney running on Discord
The Midjourney program runs on Discord, a popular chat platform for gamers and creatives. Don’t worry if you’re not familiar with Discord; we’ll cover that in a later section. There are two ways to experience Midjourney: creating art and viewing art. To create art, you’ll use the Midjourney Bot, a kind of app that only runs on Discord (for now). To view art (your artwork and everyone else’s is automatically put into galleries) you can go to the official Midjourney web app at https://www.midjourney.com/. Today, we’ll be focusing exclusively on making art, the Midjourney Bot and generating Ai Artwork on Discord.
 The Prompting interface of Midjourney
Unlike Photoshop or design software you may be used to, Midjourney uses a natural language interface, allowing you to simply write to the AI what you want. Writing a prompt is an art form in itself, and it’s what makes your art unique – or if you are working on a project – branded and consistent. Think of Prompting as your own unique blend of 11 herbs and spices – and the only thing separating your chicken from everyone else’s in a world where everything tastes like chicken!
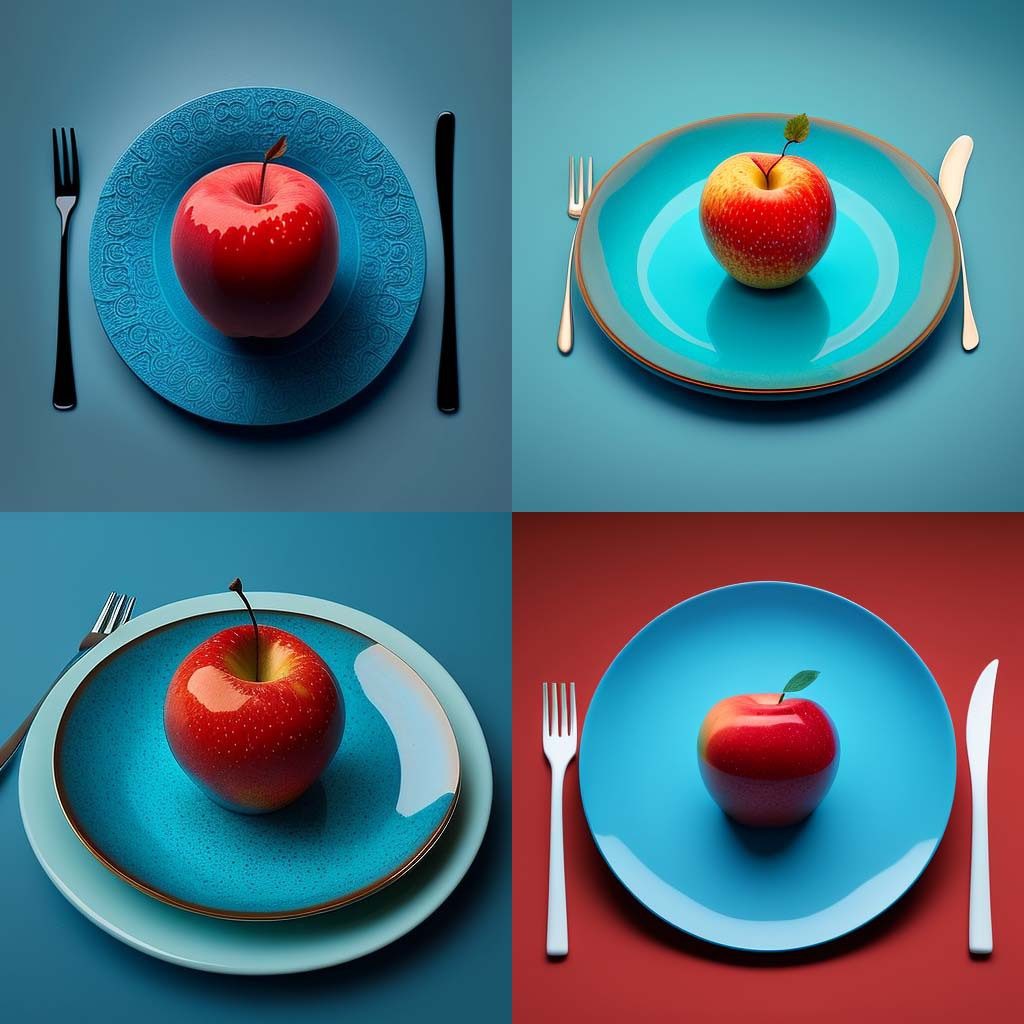
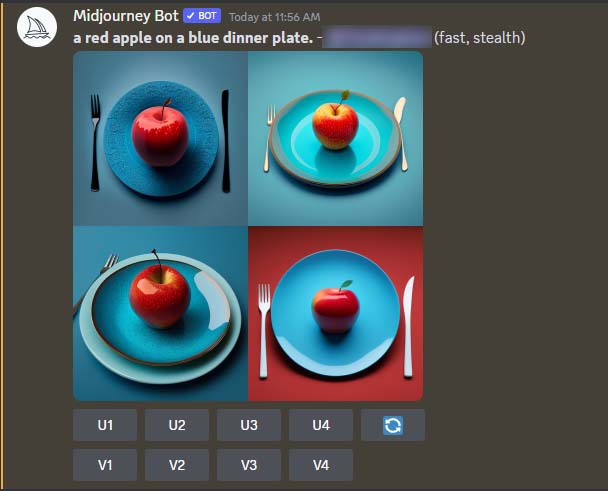
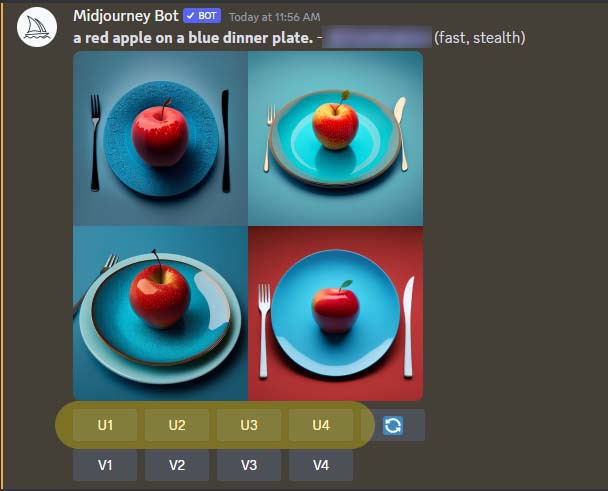
I made a simple “Red Apple on a Blue Plate” image with equally simple prompting
So, let’s dive into a world of Chicken, Prompts, and Discord, and learn how to create stunning AI generative art with Midjourney. But first things first: we need to get a Midjourney account!
SIGNING UP FOR A MIDJOURNEY ACCOUNT
Let’s start with the bad news: Midjourney has a monthly subscription fee.
Now, the good news is that Midjourney also offer a limited free trial to test the waters.
You can sign up with your email or preferred Major Platform and you’ll be ready to go. The time you’ll get to spend with a free Midjourney trial will be quite limited, but it’s more than enough to see if you’d like to spend any more time and money on… you know… the future.
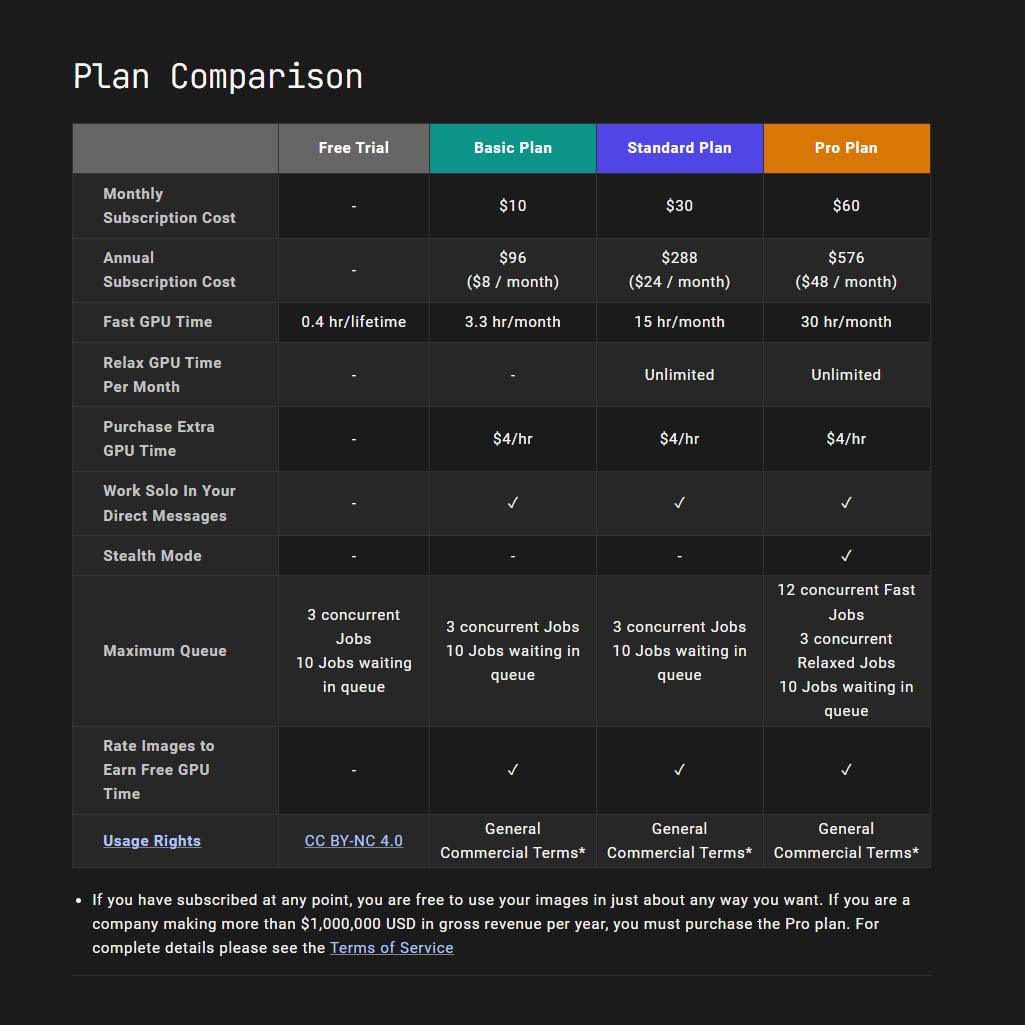
Midjourney’s Pricing and Subscription Model
Before using Midjourney, it’s important to understand its pricing model (and don’t forget the free trial!). New users can create a limited number of images before needing to pay and subscribe. You’ll have about 25 free uses, which include image generation, creating variations, and upscaling images. These uses are also referred to as “jobs” or “GPU-minutes”. But really, the only term you need to know well immediately are Fast Hours and Relaxed Hours.
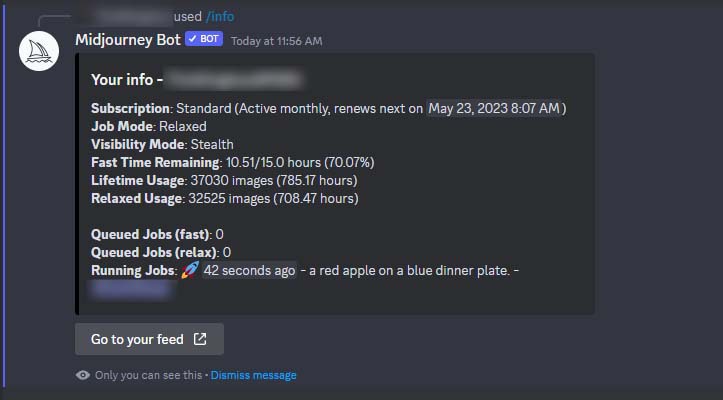 Using the “/info” command to see your Fast hours
Essentially, Midjourney has two speeds you can ask for: Fast, which is appropriately fast, and relaxed, which is wildly variable in processing wait times… sometimes up to ten minutes depending on demand! By contrast, Fast usage is typically rendered and complete within the minute.
Midjourney provides a limited amount of “Fast” hours to process jobs. Once you run out of Fast Hour GPU-minutes, you won’t be able to process images in fast-mode until they replenish at the start of your billing cycle, or if you buy them on the spot. You can also earn more fast minutes by rating images on the Midjourney main site, but I’ve never done this, so I can’t speak to its effectiveness!
The Relax mode never has any hours associated with it, and is available indefinitely. But again, be aware that relaxed may be fantastically, intolerably slow.
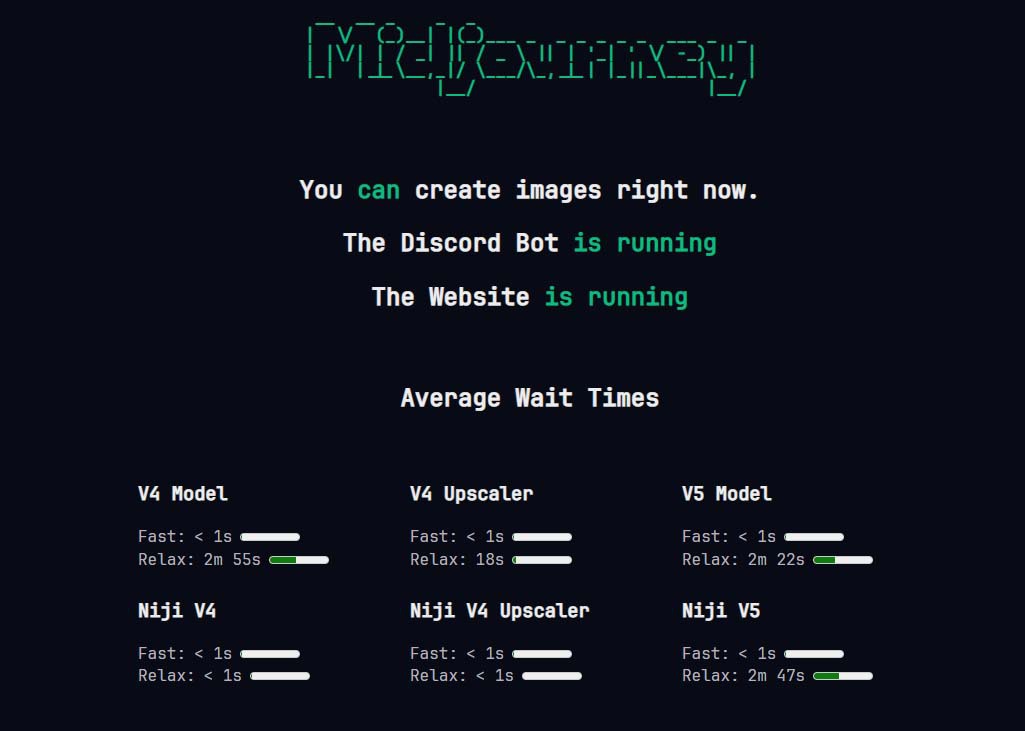 Midjourney’s Official page showing wait times, queues, and system status
To keep track of the time you have, be sure to use the /info command often. After a moment, it will show you a breakdown of your hours, processes, and a few other details. Midjourney has also instituted a new webpage that (kinda sorta) reflects the wait queues for using Midjourney here.
The distinction between Fast and Relaxed Hours will be crucial if you want to use Midjourney professionally, but for right now, just make sure to conserve your Fast hours for when you really want to workshop. Because of the cost and surprisingly fast entropy of Fast Hours, many advanced users will hold on to them by using Midjourney in relax mode while occupying their time on something completely different while their images “bake” in the background.
Regardless, you can try Midjourney before committing to it. After signing up for the Midjourney Beta, you’ll need to brace yourself, steady your nerves, and pray to the Gods above for spiritual fortitude… as we figure out how to get started on Discord.
GETTING STARTED ON DISCORD
If you’re new to Discord, getting started can seem daunting at first. But don’t worry, I’ll walk you through its… um… unique quirks! To get started with Discord, the first thing you’ll need to do is download the app on your device. You can find it in the app store for your smartphone or tablet, or on the official Discord website for desktop computers – like me.
Once you’ve installed the app, open it up and click on the “Create an Account” button. This will prompt you to enter your email address and create a password. Once you’ve done that, you’ll be ready to start using Discord.
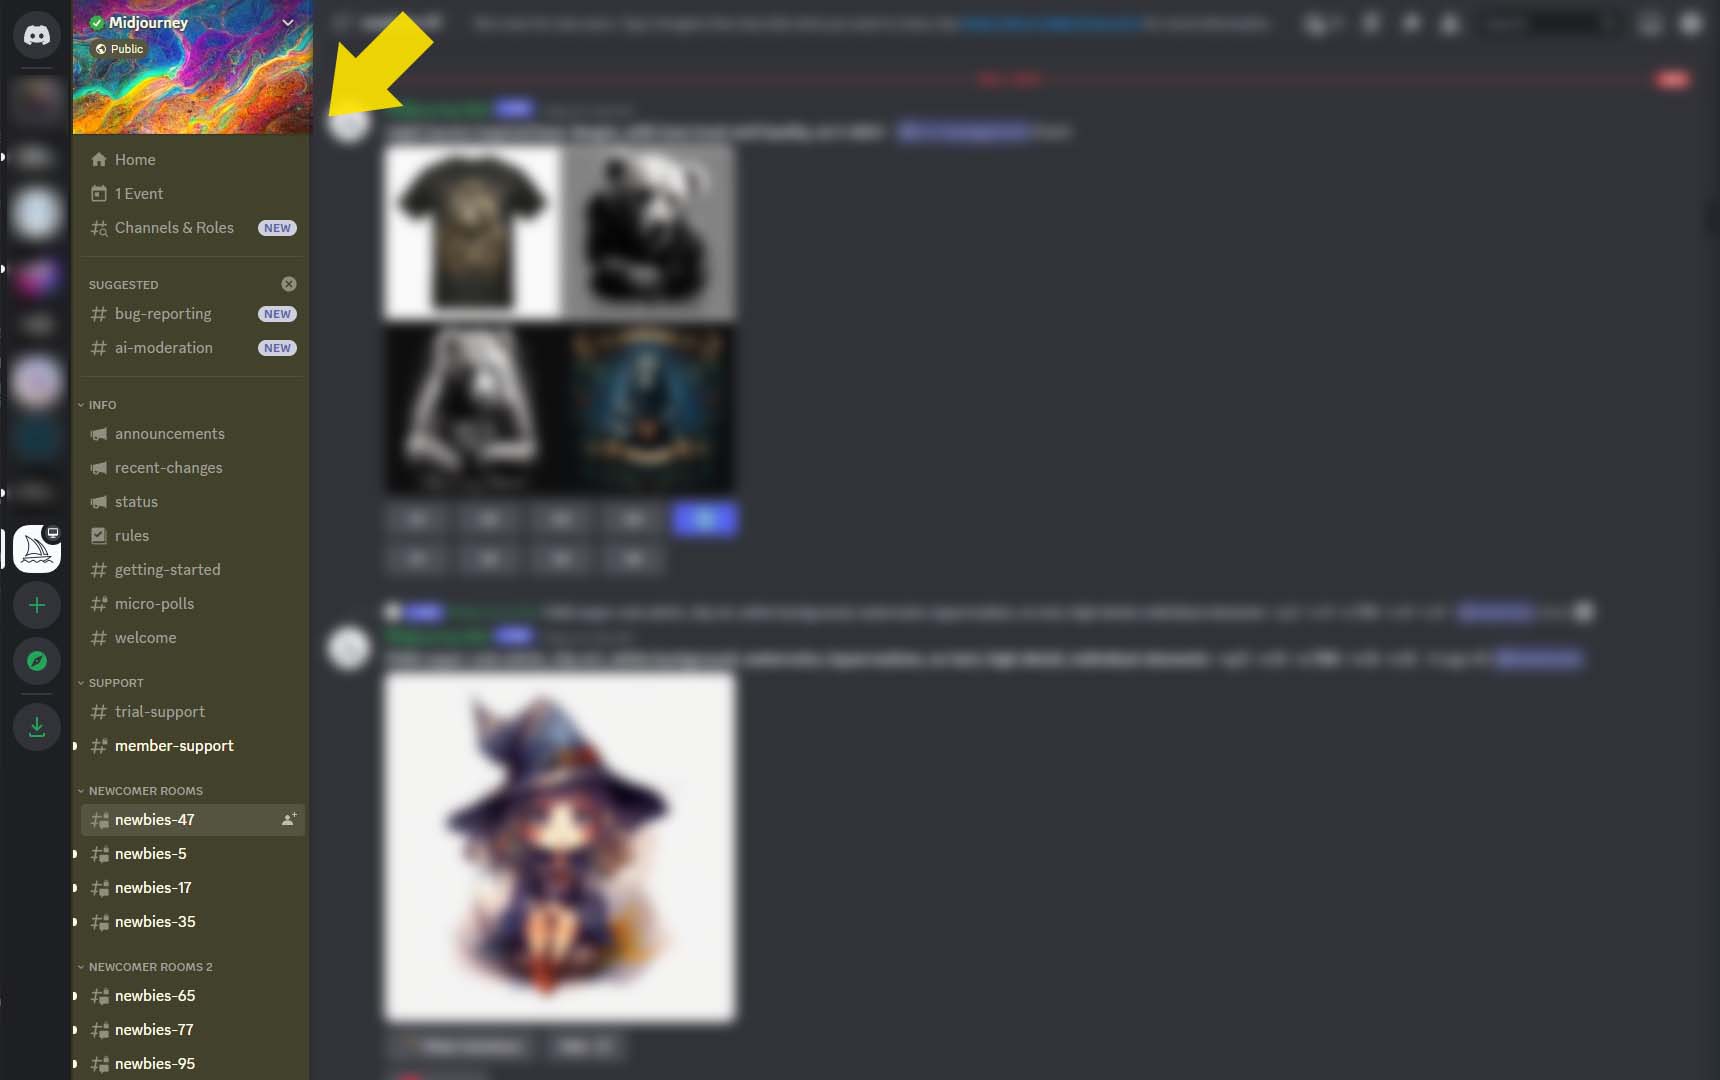
 The Midjourney Server, with its signature sailboat icon
Once you’ve created an account, the next step is to join a server. A server is essentially a group chat room within Discord, where users can communicate with each other and share information, files, and more. Whether or not you’re using Discord primarily for Midjourney (as I am), joining the official Midjourney server is a must. Additionally, if you want to use Midjourney on your own private Discord, you absolutely can. However, I highly recommend you spend your first few hours in the company of other Midjourney beginners.
 Midjourney’s Rooms, organized by much larger groupings
For now, let’s join the official server so we can learn AI art generation with other people, practically shoulder-to-shoulder. When you sign up for the Beta, you should have access to the Midjourney Discord server. You’ll see it on the left with the telltale boat logo. Click on that to join the Midjourney server.
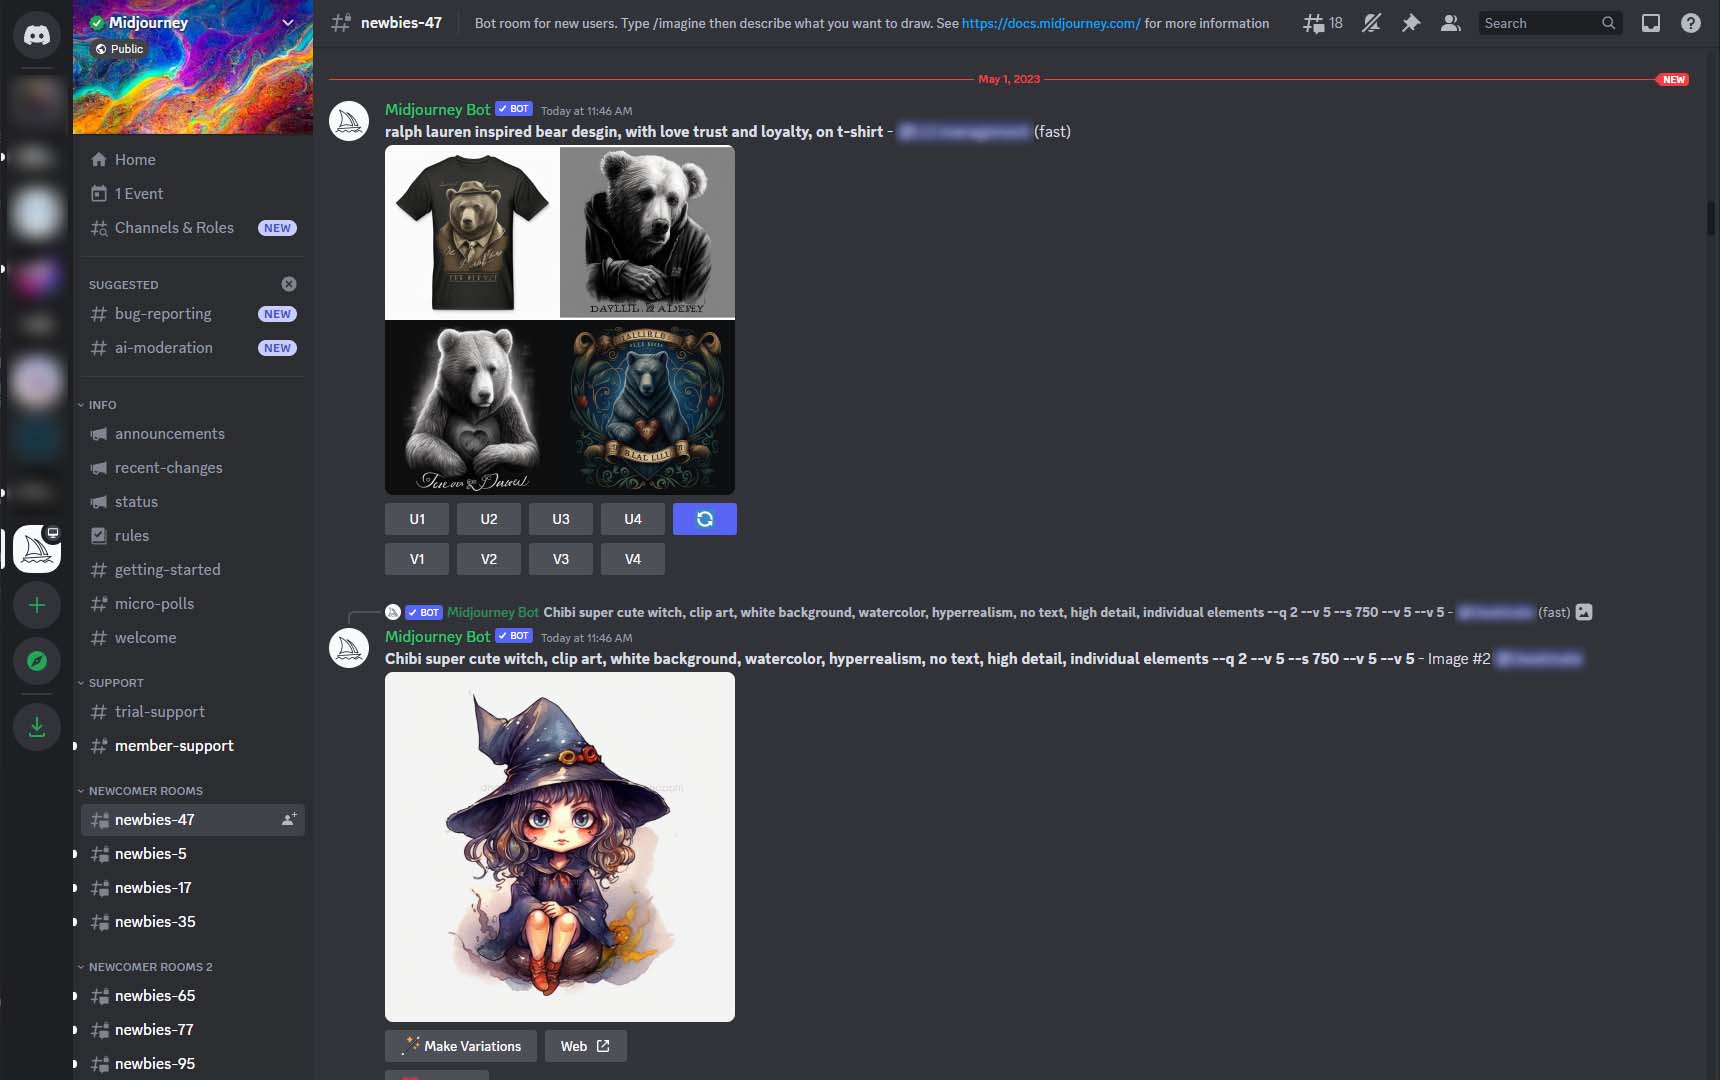
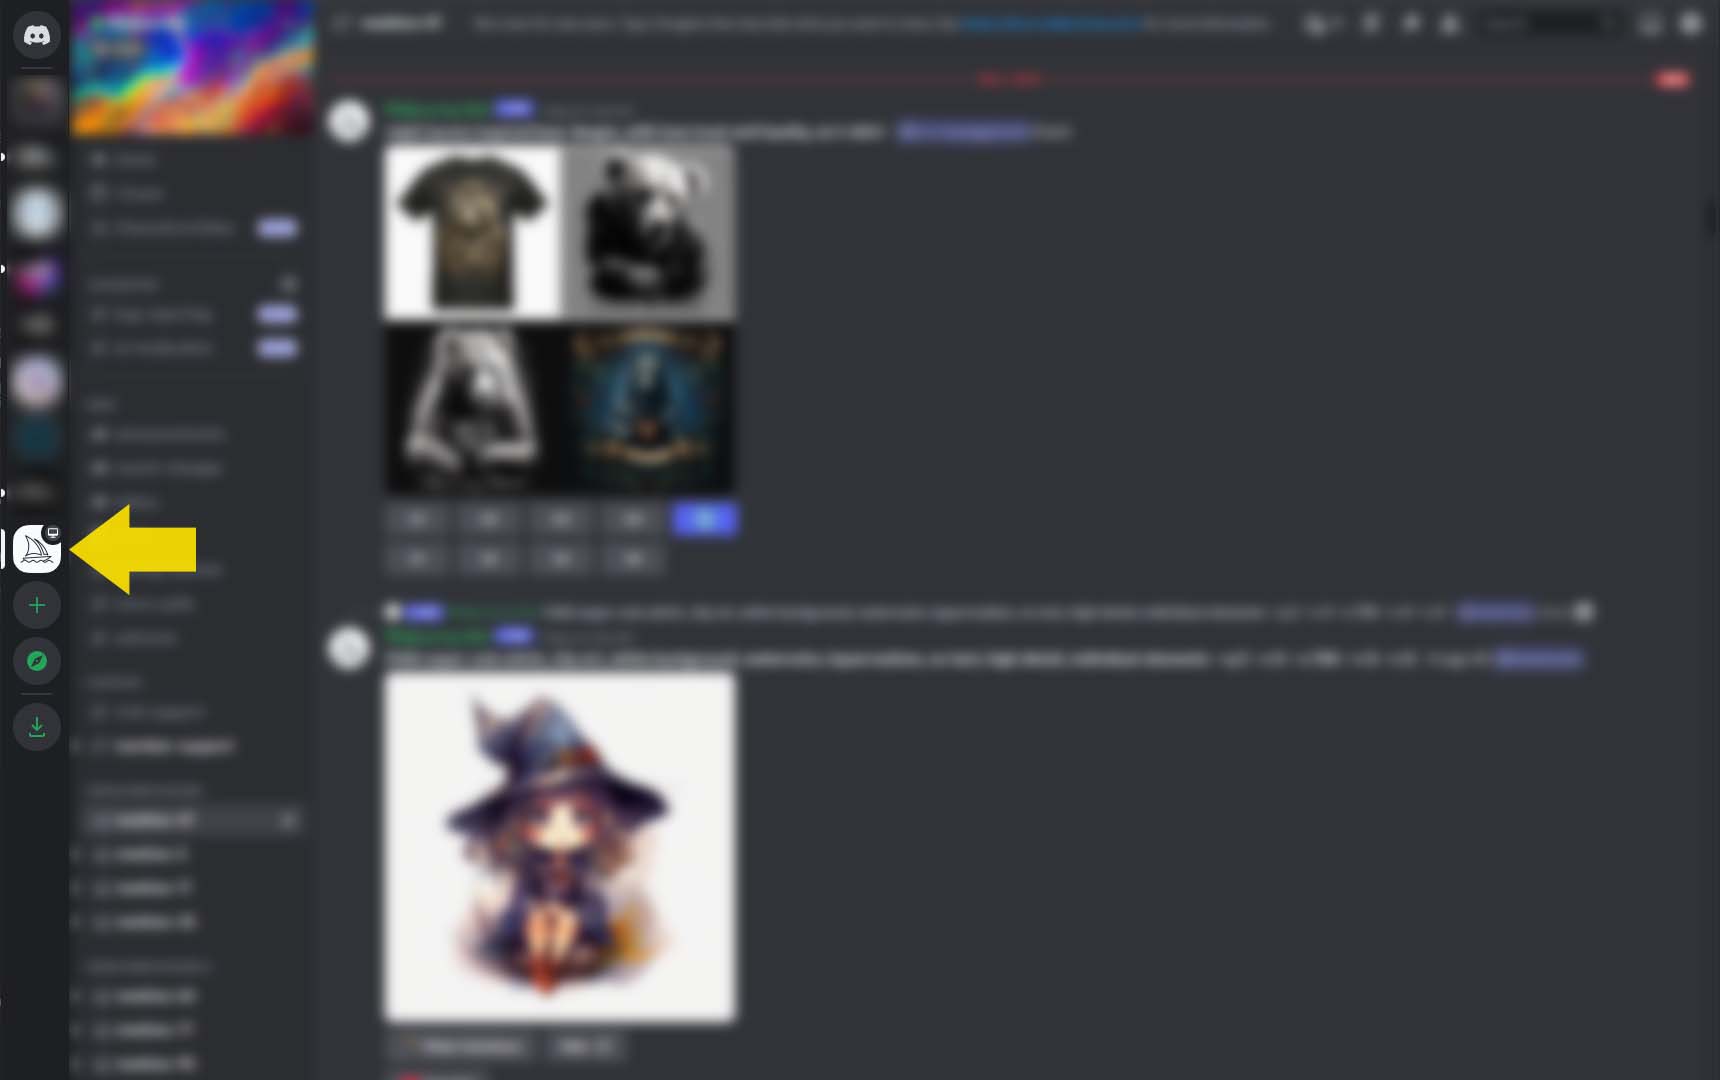
Once you’re on the Midjourney server, you’ll be able to see all of the different channels that it has to offer. These are essentially different chat rooms within the server where users can have conversations about specific topics – and in the very case of Midjourney, rooms where you can generate art. For example, Midjourney has throngs of Newbie, General, and Themed Rooms you can create in. But there are also rooms that show important feature updates and operational status, which you can not generate art in.
Joining a Newbie Room to get the hang of Midjourney
Again, not every room allows you to write or use your Bot, so make sure you’re where you need to be. It’s essential to do your due diligence when you start your Midjourney… journey, so visit the Welcome room and Getting Started room. Once you’ve got the lay of the land, join one of the newbie rooms, and let’s make our first piece of art!
PART 2 - THE BASICS OF USING MIDJOURNEY
MAKING YOUR FIRST AI IMAGE IN MIDJOURNEY
Okay, you’ve got a Midjourney account, you have access to the Midjourney Discord Server and you’re ready to make some AI generated art!
B-B-But… how? First, let’s join any of the Newcomer Rooms.
The typical scene of people using Midjourney
Almost immediately, you’ll be struck by a cascading series of images. That’s everybody in the room using the Midjourney Bot. And I mean everybody in the room. Again, it’s not like a normal App where you have privacy… or even a comfortable interface. Think: a remarkable tool hacked into a chat room. And everybody is using it all around you in realtime… All at once.
And yes, I absolutely teach you later how to make your own room in merciful privacy. But while we’re here, let’s talk about what you’re seeing happening all around you.
The standard 4-square configuration of a Midjourney image output
When you or anyone else generates an image, Midjourney will create a bundle of 4 images with significant variations. Beneath everyone’s creations (not just yours!) are 2 sets of buttons.
 The uprez Buttons highlighted in yellow
One set, labeled U for Uprez, allows you to enlarge any of the 4 images you see.
 The Variation Buttons highlighted in yellow
The other set of buttons, labeled V for Variation, will make another 4 sets of images based on the one image you chose as a source.
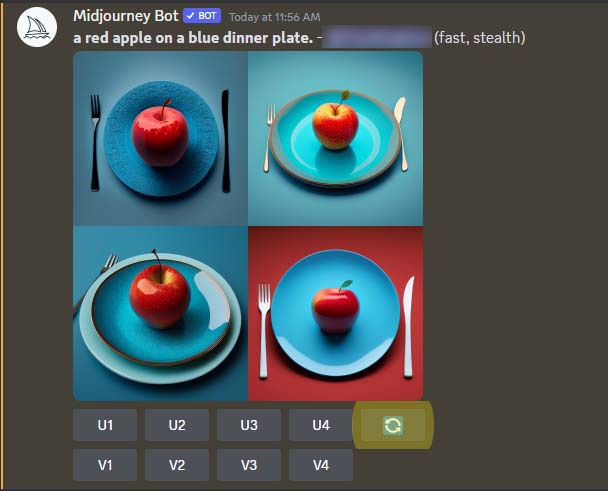
The Refresh button, highlighted in yellow
The button with the arrows is the “Redo” button, which will make another set of 4 based on your original Prompt.
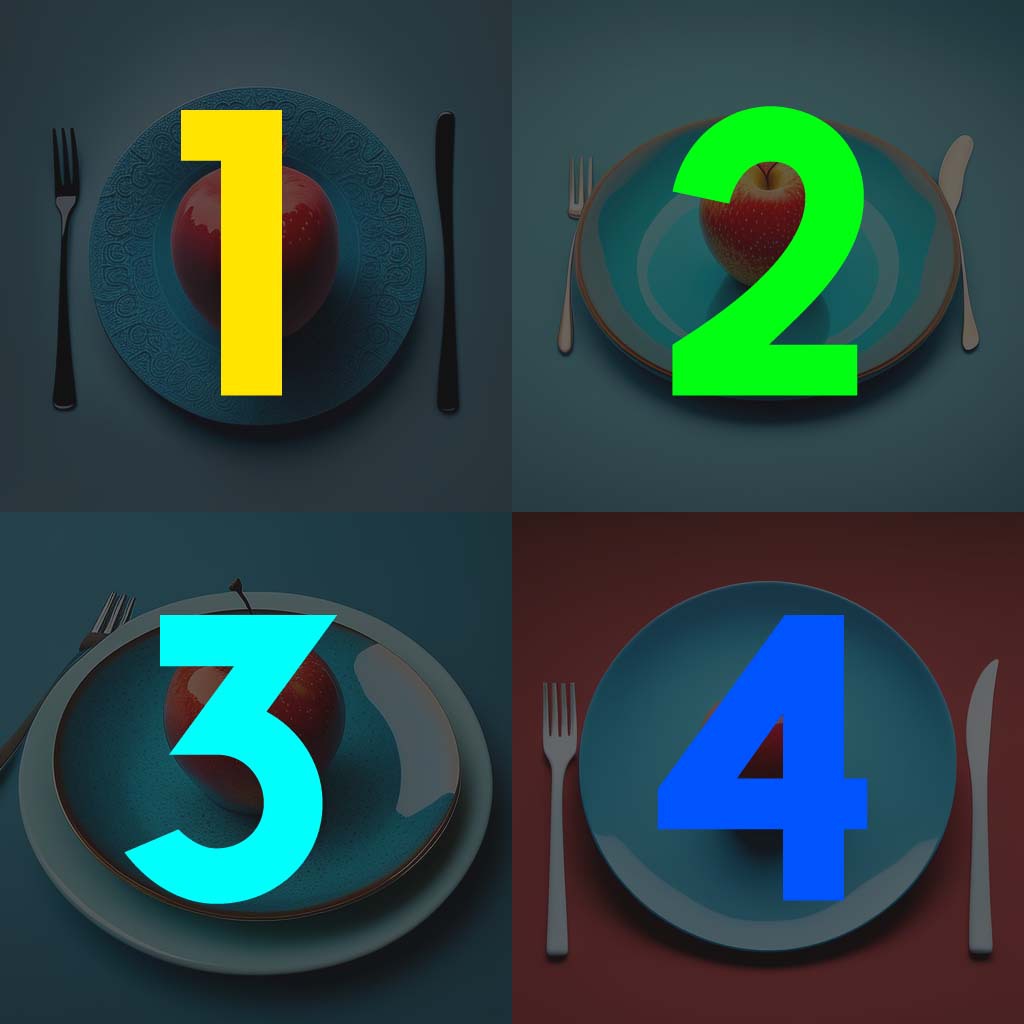 Where each Button Number is point to
The numbers identify which quadrant you’ll be choosing from, starting with 1 in the upper left, 2 in the upper right, 3 in the lower left, and 4 in the lower right. Please note: those labels are NOT clockwise!
Using Discord to Prompt Midjourney to make our art using the /imagine command
But the real interface for Midjourney is the Prompt, one of the most important concepts in AI Art Generation.
The Prompt is how you instruct Midjourney to make your image, and it couldn’t be simpler to start. Discord is a giant chatroom, so you don’t just yell into the void, “Make me art!”. You have to actually trigger the Midjourney bot with a command. Click on the chat box on the bottom of the screen.
Type in the specific Midjourney command to generate art: /imagine.
Note: when you start typing using /imagine, a dark rectangle will wrap around your text!
If you do this correctly, Discord will display the text field with /Imagine prompt: and a dark box around the chat. That means the Midjourney bot is listening and waiting for your idea. Write! Think! Dream! – and then hit enter.
“A Red Apple on a Blue Plate” was my Prompt, and we’re given this result
Slowly but surely, you’ll see your 4 images form and gain resolution (on Relaxed mode, this could take 5 minutes or more!). Discord will tell you what percentage of completion the image is at. While you can zoom in on images in-progress, you likely won’t see much, and it’s always best to let the images bake to perfection. Once the 4-image bundle is made, it will pop back on the bottom of Discord. Feel free to click and view the 4 quadrant spread in all its full screen glory.
At that point, you can hit the U buttons to uprez any quadrant of your work with greater size and detail. Or you can hit V to create a variation of any of the 4 selections. The rotating arrow button to the right of the U buttons is the redo; and recreates all 4 images from scratch.
REASONS TO STAY IN THE BEGINNER ROOMS
So let’s review. When you want to make art in Midjourney, you have to use the /imagine command. Then you write in your Prompt.
Midjourney will make 4 images, which you can either uprez, vary, or refresh with buttons underneath each image. Everybody in the Discord room has these buttons, and any one can trigger these buttons to generate more art. That’s right, people can make variations and uprez’s of your art and you of theirs!
Which, admittedly, is pretty disconcerting or inspiring – depending on which end of that equation you happen to be on. Combined with the chaotic frustration of a always-moving chat room, you may be tempted to immediately find a way to make your own room (and don’t worry, we will).
The ever-moving Midjourney Newbie Room on Discord
But for your first few moments with Midjourney, and indeed, with Ai Art Generation, I recommend joining the newbie rooms. Beginner Rooms do have unique benefits:
- Prompts. Experimenting with Prompt grammer and structure is a vital part of getting up to speed on Midjourney quickly. By creating inside Newbie rooms, you’ll see not just what people input, but a wave of referenced Artists, Art styles, techniques, phrasings, methodologies… you’d be amazed what you’ll learn just from observation.
- Homogeny. You’ll also very quickly start to see how Midjourney, in spite of its astounding technology, tends to make things samey, or at least, leaves telltale Midjourney clues that will allow you to detect human art from Ai Generated Art. This was much more of a problem in v3, a subtle problem with v4, and almost (but not quite!) nonexistent in Version 5.
- Suffixes and adjustments. More advanced ideas like aspect ratios and quality are easy enough to understand. But wilder ideas like –niji, the no command and weighing prompts are much better understood by mass observation & experimentation.
- Exciting. You should engage in this miraculous technology in a void. You should be around other excited, expressive Creatives delighting in the new Art Democracy. Get in there, mix it up, and fall in love with the process. You are the first generation in Human History to be able to do this, let’s get a little energy going here, people!
USING MIDJOURNEY COMMANDS
Midjourney also allows you tweak certain parameters of your image at the end of your Prompt. You can engage these by adding a double dash, then the proper command. Here is a list of the commands you’ll want to be aware of, even as a beginner.
What happens after you input the /info command
–
The /INFO Command
Bit of a misnomer, but /info isn’t suffix you put at the end of a prompt, it’s a single command you type in the chat box all by itself, like the /imagine command. Info is vital for giving you details on the following:
- Your Remaining Fast Hours
- What Images are Actively being processed
- What Images (fast and relaxed) are queued.
- How long have images been processing
The last one, how long images have taken to process, is important to figure out if an image has stalled (in which case, check out the Midjourney Discord room STATUS) or just how not-fast relaxed mode is.
/Info can also reveal “stuck” processes, or images that are taking a ridiculous amount of time to process, as in upwards of 30 minutes(!). If any process takes way too long, it will usually be naturally flushed out of the system. But if it’s been a day, go to the member Forum and ask a Mod to empty your queue.
Note: WordPress doesn’t like two dashes together, so whenever you see a single dash like this -, it’s actually DASHDASH! Like this – – but without the space!
Landscape, Square, and Portrait sizes altered by the –AR or Aspect Ratio command
–
Aspect Ratios (–AR)
Typing in –ar after your prompt allows you to change the aspect ratio of your art, and it’s the most important parameter to know early. Defaulty, Midjourney creates images as a square, or a 1:1 ratio image. If you want a landscape… um… landscape, you’ll need to put in a different aspect ratio. As of this writing, Midjourney supports any number of ratio combinations for Version 5 and Niji 5. Just remember, it will round down to the lowest integer: 16:8 will be shrunk to 2:1, but 5:16 cannot be shrunk to 2.5:8.
A few creations using the –Niji command
The NIJI Command (–Niji)
Niji is a very new Midjourney command that pretty much is a world unto itself. Niji (pronounced Nee Gee) is an anime-specific command that makes your prompt run through an aggressive amount of anime-specific data sets. Niji produces some very surprising results, sometimes especially outside of anime usage. Treat Niji as an exciting mutagen to your prompts and experiment away!
–SEED
Seed is the most “advanced” of the basic commands you may want to familiarize yourself with. When you generate an image from a Prompt, the criteria it uses to generated are based on a random number, a seed. This seed is completely randomized everytime, which means your creations start and have infinite random possibilities.
The Seed Command plus a number (say, 12345) will make sure that every one of your generations starts the same way, with that seed number. Anyone who has that seed number will generate the same thing as you, the exact same way.
An easy way to demonstrate is to use the same prompt I have: /imagine A cute beagle puppy in an astronaut suit.
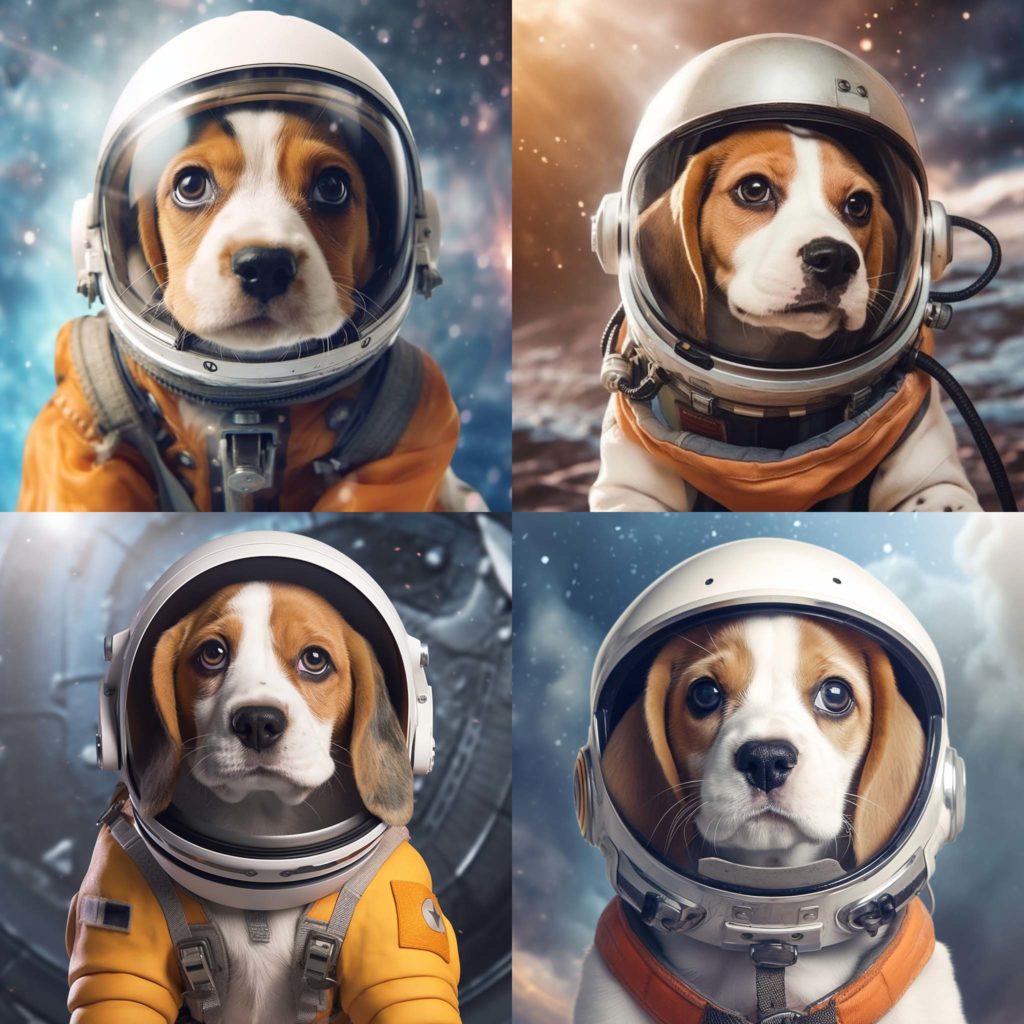
If you try my same prompt, you will never get this set of puppies in a million years, mathematically!
And that’s what I got. You’ll get something different and the next person that reads this and so on. Now try the seed command at the end:
/imagine A cute beagle puppy in an astronaut suit. –seed 12345
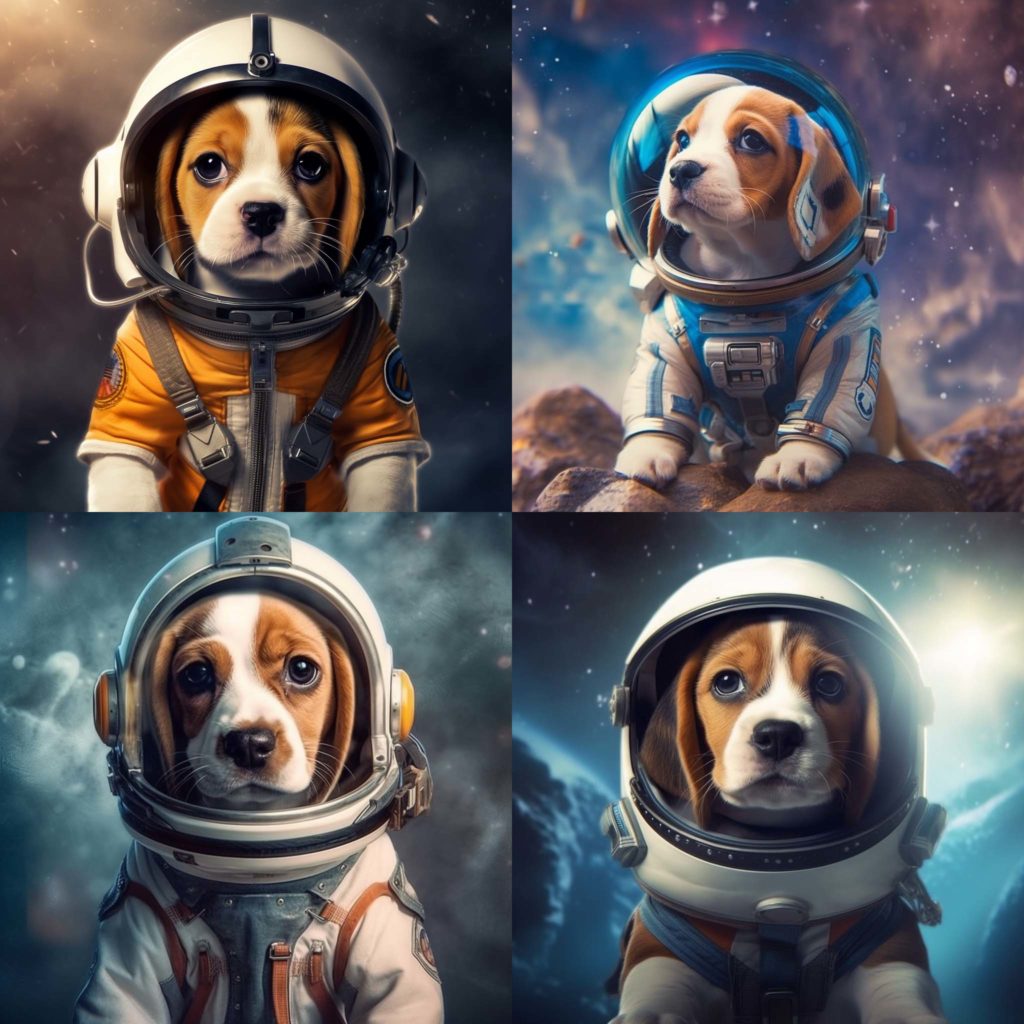
My same prompt, but at the end we add –seed 12345
And you’ll get exactly the same image as me above. Aww, wook at da widdow guy!!
PART 3 - SETTING UP YOUR OWN PRIVATE MIDJOURNEY ROOM
No but seriously, what is this nonsense?
As a new Midjourney user, it won’t take long for your patience to erode by the frenzied pace and claustrophobic nature of using Discord to run this program. I would even argue it’s counterproductive and creatively distracting. Naturally, you deserve to enjoy the fruits of the future in peace and reverent silence, so let’s get to why most of you are really here:
How the hell can I get my own private room to use Midjourney?
No worries! Here’s the easy 3 step process.
Step 1: Create Your Own Server. Click the Plus symbol in the upper left hand corner, it should be labeled “Add a Server” when you hover over it. This will start the very quick process of adding details to your own private Discord server. This will open a Setup Guide to help you through a fairly stress-free process of creating the Server. Once you’re done, hit the “Create” button.
Step 2 (Optional): Create Your Own Channel. Great, we now have our own Discord Server! You should see it’s icon on the left of the screen if you added one. Defaultly, you should have a General Room already set for you. But if you’d like a separate room just for Midjourney, click the “Plus” symbol to the right of Text Channels, it will be labeled “Create Channel” when you hover your mouse over it. The process is pretty straightforward, but if you are somehow paranoid of strangers bumbling into your room, you can set it to private.
Step 3: Add the Midjourney Bot. We won’t be able to make any images in our private room without the Midjourney Bot, which is treated like a person on Discord. That means we’ll need to invite them to our Server and our room. Click on the Midjourney logo, which will open up it’s profile as though it were a user. You’ll see a button labeled, “Add to Server”. Select your Server from the list and, voila, you’re all set!
Test if your new private room can generate images with a quick test of the /imagine command. If it doesn’t work, you can always try Midjourney’s Official Setup instructions. But if it does work, congratulations, now you can create in blissfull, merciful comfort.
REDIRECTING IMPORTANT MIDJOURNEY MESSAGES TO YOUR ROOM
There are two Rooms you’ll frequently want to visit on Midjourney’s Discord Server: Announcements and Status.

The Announcements Room of Midjourney
The Announcements Rooms usually herald very big version changes or additions, and while the updates are rare here, they are hugely impactful to your work.
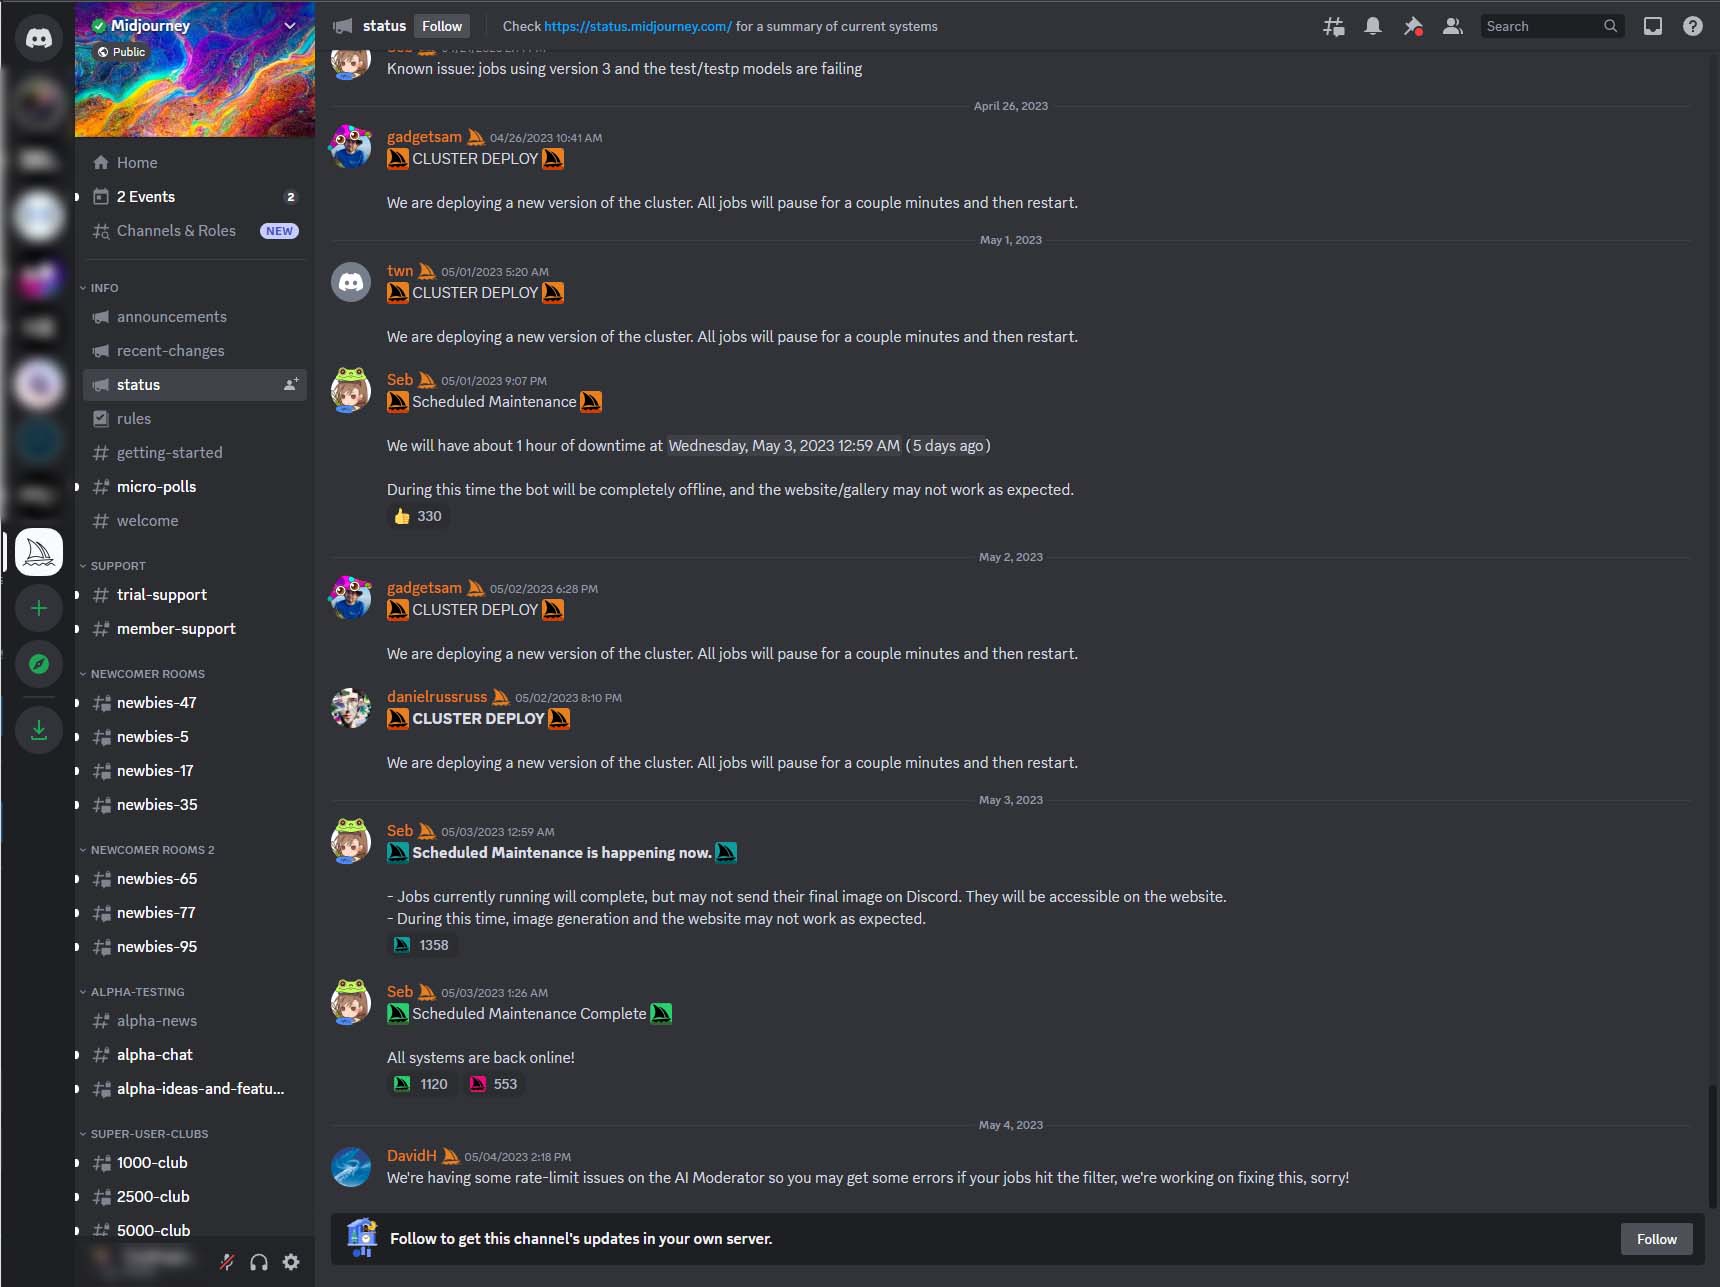
The Status Room on the official Midjourney Discord
The Status Room gives you updates on Server outages, bugs, sudden mishaps and the like. Midjourney and all Ai generative tools are incredibly new, so being up to speed on what’s going on (or wrong!) with the tool is always to your day-to-day benefit.
You’ll definitely want to check in on Announcements and Status, but there’s an easier way to keep up to speed on Midjourney’s incredibly rapid development. You can have the messages in those rooms actually appear in your own private room!
To do so, go to each room your want to receive important announcements from, in this case Announcements and Status, and click on the “Follow” button in the lower right corner. From there, you can select which of your Servers and Rooms you’ll receive updates from. And boom, you’re done – now critical messages from Midjourney will appear in your private room!
THINGS I WISH SOMEBODY HAD TOLD ME ABOUT MIDJOURNEY
On slowdowns, errors and general weirdness on your Ai Art Generations. Check the Status Page on Midjourney’s Discord when you get errors or your generations are taking a long time to make – let’s say longer than 20 minutes. When you start getting consistent weirdness, it’s almost always something on Midjourney’s end, though they are very communicative with the community.
On vital new features that aren’t showcased anywhere else. Check the Annoucements page, those are where major, earth-shattering updates are revealed in almost mumbling silence. For example, the deployment of the niji prompt and the addition of 16:9 formatting were all announced on Discord, and without that knowledge, you would have no way of knowing – outside of seeing somebody use those commands in the wild.
On what “private / stealth” mode actually means. The terms has changed recently due to so much confusion but basically, Midjourney takes every one of your creations, and I mean every one, and hosts them on their main site. If for whatever reason you don’t want you art seen by the public in that way, you can buy the private / stealth mode for a whopping $20 extra. This DOES NOT hide your artwork or generations in public rooms. It only hides your work on the Midjourney site. To hide your generations from other people on Discord, you’ll need to make your own server.
On why Midjourney gives you the option to hide or Midjourney suddenly hides generation. Some Prompts are “hard locked” for obvious reasons so you can’t make questionable material. But some subjects fall into a legal and moral grey area, for example, bikinis. So some words are “soft locked”. When you generate a Prompt with a soft-locked word, the Generation and final product will be hidden to everyone except you. You can even hide the image if you want. Sometimes Discord collapses all the posts that have the visibility option, and they are removed from your Room! This is especially alarming because I’m not quite sure what causes this, but absent remembering the link to the image, they are effectively lost forever.
On why Midjourney outputs sometimes feel very “samey”. Midjourney’s V4 had a pretty rigid default lighting setup and lighting colors as well as only a few ways it likes to frame people and buildings. After so many creations, your brain will absolutely detect the same Midjourney orange, the same Midjourney portrait placement, and the same Midjourney single lighting solution. You can easily fix this with much more specific Prompting (burnt sienna, sunkist, or amber instead of orange) or by doing very light color correction in Photoshop. Nevertheless, there are telltale signatures of Ai generation that Midjourney still leaves behind, even on the venerable Version 5, like its incessance on salmon orange.
On wanting to turn a profit on AI Art as soon as possible. I have no doubt the entrepreneurial spirit beats forever in the breast of all AI Artists, but give me a second here. As of this writing, AI Artwork is a hot-button topic with two major facets to understand. One, a bunch of people’s livlihoods just went up in smoke practically overnight. Two, art marketplaces profit far more from AI Art than from Human Art. Those ideas conspire to create a world where you absolutely can sell AI Artwork, but you need to check with each individual Marketplace. For example, Etsy allows AI Art, but you must disclose it and Adobe welcomes it with open arms. Doublecheck the terms and the crowd: some people may be very hostile towards Ai artwork in their Human Marketplaces!
CONCLUSION
Congratulations, you intrepid Artificial Intellgience Artisan! You’ve just run through a crash course in the absolute basics of Midjourney, the best tool for AI Art Generation out there so far. In fact, you industrious little John Conner, you’ve done the following:
- Signed up for a Midjourney Account from their website
- Signed up for Discord and entered a Beginner Room
- Made your first AI generated piece of artwork
- Bonus points if you used a command like a wide landscape format, or tried out niji!
- Gold star if you redirected Midjourney’s messages to your own private Room!
For our next Guide, we’ll be divining into Advanced Techniques like Seeding, Describing, and even the forbidden art of Prompt weighing.
If you enjoyed this guide, please look around for my other guides on game UI, or check out my Mentorship program and learn how to break into the video game industry as a UI UX Designer!
BECOME A UI ARTIST & UX DESIGNER IN THE VIDEO GAME INDUSTRY!
THE GAME UI UX DESIGN NEXUS
MY PRIVATE 1-ON-1 DESIGN MENTORSHIP BOOTCAMP
Hey there! I’m the guy that wrote this Blog. In addition to giving away lots of free insider information about being a game UI Artist – I also run a 1-on-1 Mentorship program that teaches you how to break into the game Industry through UI Art and UX Design. Stop getting blind-sided by rejection letters and struggling all alone. Get your dream job, join my Mentorship!


